
Easypay plugin for woocommerce
Plugins serve as software between your store and the easypay online payments service (APIs), allowing you to:
- Have one or more plugins installed, depending on your contract with easypay.
- Test easypay online payment services (sandbox) with those plugins before entering production.
Available payment methods plugins:
How it works
Your customers make a purchase and pay using any of the payment methods available through the easypay payment plugin.
Once the payment process is complete, easypay notifies the plugin and you can also check it at easypay’s Backoffice.
1. Easypay Visa & Mastercard
Allows the payment of orders by Visa & Mastercard (single payments) in your store.
The customer is addressed to the easypay gateway, where he will have a secure authorisation of the amount on the card and subsequent capture (which may be manual or automatic):
- Once the transaction has been authorised by the card issuer (bank, Revolut, SIBS), the customer is addresssed back to your online store.
- Payment capture:
- If you configured ‘auto_capture’, the plugin captures the funds as soon as possible.
- Otherwise, to capture the payment manually, you need to go to the easypay backoffice in the menu “Credit Card” > “Request Payment”.
- Once the payment process is complete, easypay notifies the plugin.
Note: To enable Visa & Mastercard on your website, it must be approved by Visa & Mastercard – place the request with easypay. Approval may take a few days.
2. Easypay Multibanco References
Allows the payment of orders using Multibanco References in your store.
On completing the purchase, your customer will receive an e-mail with the necessary payment ID (Entity, Reference, Value) for making the payment (with their homebanking or an ATM).
Once the payment process is complete, easypay notifies the plugin.
3. Easypay MBWay
Allows the payment of orders using MBWay in your store.
When your customer completes his purchase, he will receive a notification in the MBWay App of the payment request with the order value, and will have 5 minutes to approve the payment.
When the customer authorises the transaction:
● If you configured ‘auto_capture’, the plugin tries to capture the funds from the customer.
● Otherwise, you need to go to the easypay backoffice, where you will find the payments pending capture: MBWay > List > Authorisations and Purchases >, select the button “log” and then “Capture Payment”.
Note:
● ‘Auto_capture’ can be enabled in WooCommerce.
● Once 5 minutes of customer approval time have elapsed, the request and authorisation will automatically be canceled.
● If your customer has not adhered to the MBWay system, this payment method will not work.
4. Easypay Santander Consumer Finance
To enable Online Credit – Santander Consumer Finance – contact easypay previously for approval of your business area by Santander Consumer Finance.
This plugin is for paying orders using (single payment) in your store through financing. On selecting this payment method, the customer goes to the Santander Consumer Finance gateway, where he should follow the steps. Once the financing has been approved or rejected by the acquirer (Santander Consumer Finance), easypay will notify the plugin of success or rejection depending on the acquirer’s decision.
Note:
● The services of Santander Consumer Finance only allow payment of amounts between 200 € and 6,000 €. Accordingly, in your store, the plugin will automatically hide that payment method for orders of amounts which are outside that interval.
● As easypay is a Credit Intermediary, the merchant does not need to be.
● More about this payment method: https://www.easypay.pt/santander-consumer-finance-faq/
5. Easypay Universo Flex
Paying for orders in installments with Universo Flex – available for the Universo Card.
On selecting this payment method, the customer goes to the Universo Flex gateway, where they must follow the steps indicated. In particular, select the payment method and confirm it. After this process, the authorisation will be approved or rejected by the acquirer (Universo Flex) and the customer will be redirected back to the online store.
Easypay will notify the plugin of success or rejection depending on the acquirer’s decision.
Once the payment process is complete, easypay notifies the capture to the plugin.
Note:
● As easypay is a Credit Intermediary, the merchant does not need to be.
● More about this payment method: https://www.easypay.pt/universo-flex/
Before installing the easypay plugin
● Please be aware that if you have had a previous version of the easypay woocommerce plugin, you will always have to start by uninstalling previous versions of the plugin. You cannot have older versions of the plugin installed simultaneously.
● You must have an easypay Payment Account – sandbox or production – with the desired payment methods activated. When signing up to easypay, indicate the payment methods you want.
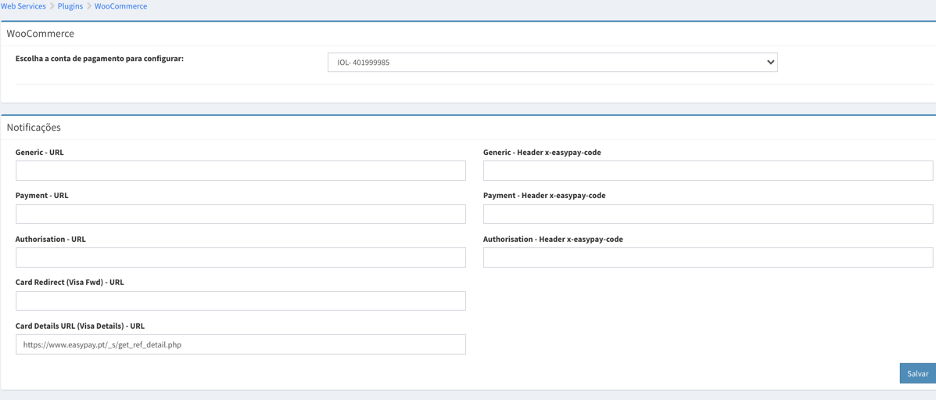
● Once your account is active, go to the easypay backoffice as follows:
WebServices>Plugins>Woocommerce:

● Select the easypay Payment Account you want to connect to your woocommerce store (if you have more than one).
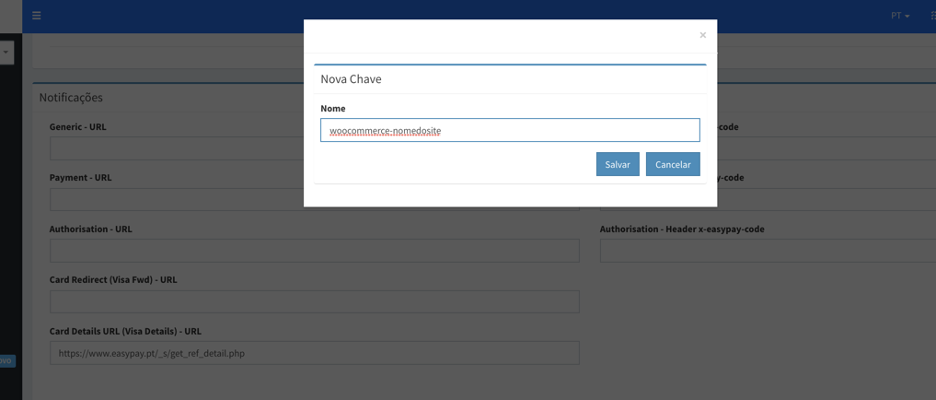
● In Keys> + New (button), give your API key a name and save it (woocommerce-site name). You will be redirected back and the table will show the account ID and API key. You will need this information on your plugin.

Installing the easypay plugin
(1) Download the plugin from https://www.easypay.pt/woocomerce/ depending on the payment methods you want to use: Multibanco, Visa & Mastercard, MBWay, Santander Consumer Finance, Universo Flex.
(2) Install with the WordPress plugin installation OR open the plugin zip and copy and paste into the plugin directory, certifying that the server can read the plugin files directory (555) and files (444).
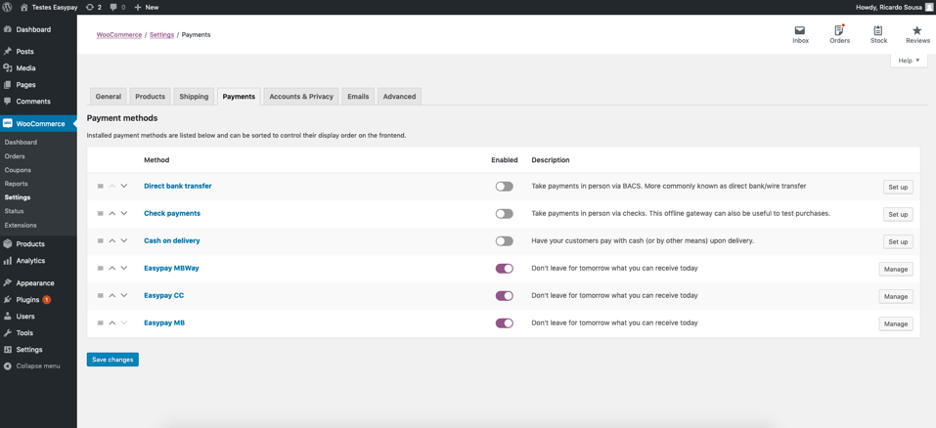
(3) Activate the plugin in the plugins list. A name is given to the plugin according to the payment method:
● Easypay CC
● Easypay MB
● Easypay MBWay
● Easypay Santander Consumer Finance
● Easypay Universo Flex
Note: woocommerce must already be installed.
Configuring the easypay plugin
All plugins require an account ID (easypay Payment Account) and an API key.
Create these keys in the easypay backoffice before installing the easypay plugin.
It is enough to create a key (ID+Key) for all payment methods.
Enter the account ID and API key in the plugin.

Easypay Sandbox
- Check this box if you want to use easypay sandbox (test mode).
- If you are using Sandbox, the account ID and API key must be generated in the easypay sandbox backoffice: WebServices>Plugins>Woocommerce
- The production account ID and the API key pair will not work in test mode and vice versa.
Note: When test mode is activated, there is no transaction of any monetary amount. Use it only for test purposes.
Debug
Select this option if you want to check error logs, by activating the “Enable logging” option.
Specific payment method plugin configurations
Visa & Mastercard
Automatic Capture – Auto Capture
Select this option if you want funds to be captured automatically after the payment authorisation. Note: You must validate whether there are requests for validation/payment capture.
Notification URL
This is your system’s URL – Notification URL – which easypay will use to communicate payment status or other operations to the plugin. If using more than one payment method, in the easypay backoffice, only one Generic URL will be configured (for either).

Copy and paste the notification URL into the easypay backoffice:
>Web Services>Plugin>Woocommerce> Notifications> paste in Generic-URL

VISA-FWD URL
This is the URL to which your customer will be redirected after leaving the easypay payment gateway, with payment authorised or rejected.

Copy and paste this URL into the easypay backoffice >Web Services>Plugin>Woocommerce> Notifications> paste in Card Redirect (Visa Fwd) – URL
It is sufficient to register a Generic-URL only once (for either).

Multibanco References
Expiry days
Defines the maximum number of days of validity of the MB Reference issued. After that date your customer will no longer be able to make a payment. A value between 1 and 3 days is satisfactory for most merchants but values of 1 to 180 days are accepted.
Payment references are valid until 23:59 on the day defined.
Enable Expiry for MB References
Select this option to force payment expiry. Your customer may not pay after the number of days defined. If you do not select this option, the payment reference has no validity. If you activate this option, once this reference has been paid for, it may not be paid for again.
Notification URL
This is your system’s URL – Notification URL – which easypay will use to communicate payment status or other operations to the plugin. If you have more than one payment method, you only need to configure once.
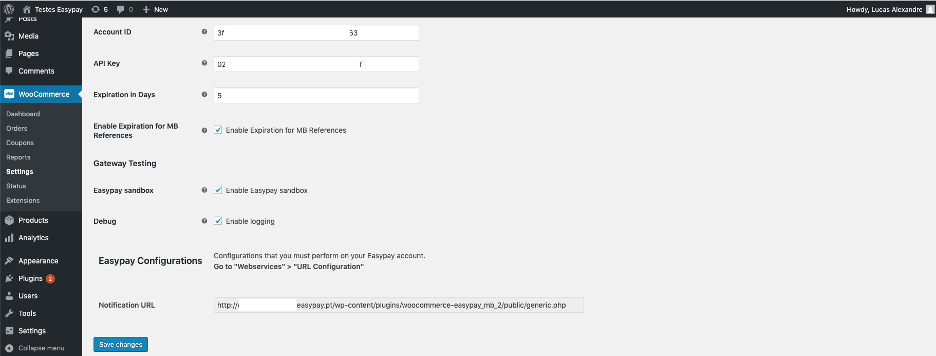
Copy and paste this URL into the easypay backoffice >Web Services>Plugin>Woocommerce>Notifications > paste in Generic-URL
It is sufficient to register a Generic-URL only once and it does not matter which.

MB WAY
Automatic Capture – Auto Capture
Select this option if you want funds to be captured automatically after payment authorisation. Note that you must validate whether there are requests for validation/payment capture.
Notification URL
This is your system’s URL – Notification URL – which easypay will use to communicate payment status or other operations to the plugin.
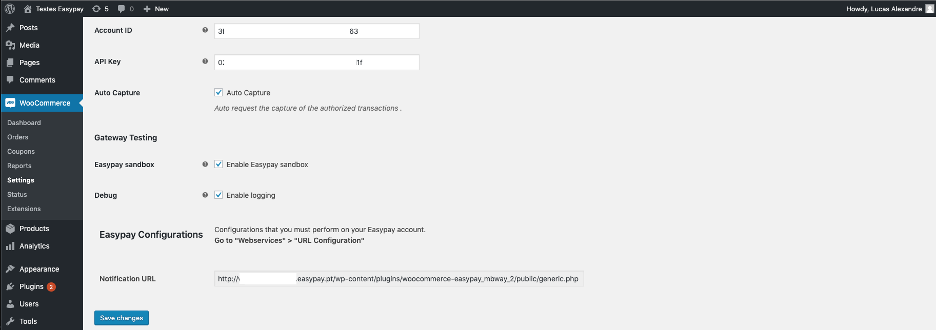
Copy and paste this URL into the easypay backoffice >Web Services>Plugin>Woocommerce>Notifications > paste in Generic-URL
It is sufficient to register a Generic-URL only once and it does not matter which.

Santander Consumer Finance
Note that to have Santander Consumer Finance you must make a request to easypay for validation of your business area.
Notification URL
This is your system’s URL – Notification URL – which easypay will use to communicate payment status or other operations to the plugin. If using more than one payment method, in the easypay backoffice, only one Generic URL will be configured (for either).
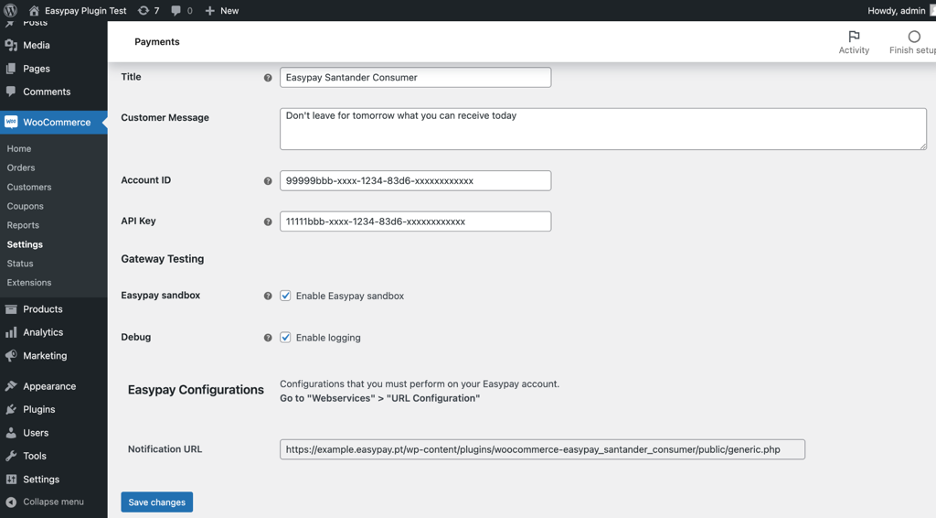
Copy and paste the notification URL into the easypay backoffice:
>Web Services>Plugin>Woocommerce> Notifications > paste in Generic-URL

Universo Flex
Note that to have Universo Flex available on your site, easypay must have the payment method active in easypay – communicate to easypay your intention to activate Universo Flex.
Automatic Capture – Auto Capture
Select this option if you want funds to be captured automatically after payment authorisation. Note that you must validate whether there are requests for validation/payment capture.
Notification URL
This is your system’s URL – Notification URL – which easypay will use to communicate payment status or other operations to the plugin. If using more than one payment method, in the easypay backoffice, only one Generic URL will be configured (for either).

Copy and paste the notification URL into the easypay backoffice:
>Web Services>Plugin>Woocommerce> Notifications > paste in Generic-URL

VISA-FWD URL
This is the URL to which your customer will be redirected after leaving the easypay payment gateway, with payment authorised or rejected.
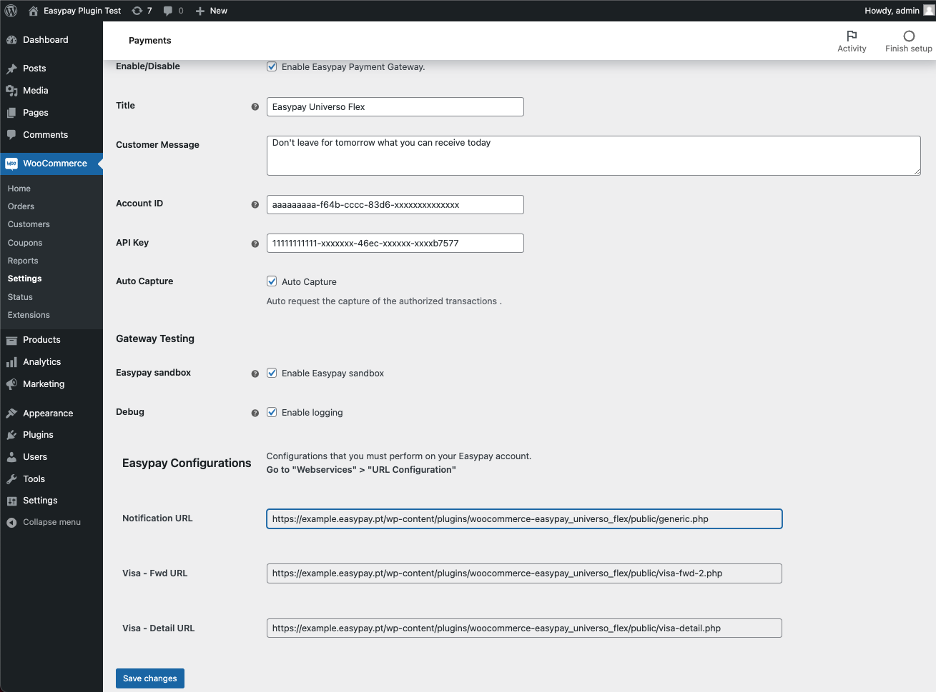
Copy and paste this URL into the easypay backoffice >Web Services>Plugin>Woocommerce> “Notifications”> paste in Card Redirect (Visa Fwd) – URL
It is sufficient to register a Generic-URL only once (for either).
Final Notes
- If you want to know how the plugin uses easypay payment APIs, see our documentation: https://api.prod.easypay.pt/docs
- Whenever a payment is successful, easypay will send a “Generic Notification” to your “Generic – URL” with the “single payment” payment “id”, mentioning “type”:”capture”, “status”:”success” and the payment date/time.
- On receiving this notification, your system may enter into your payments table the payment details contained in this “id”. Therefore, it is imperative that the “Generic – URL” is completed in your Back Office.
- It does not matter whether the field “Generic – URL” is completed with the “Notification:URL” of MB, the Credit Card, MBWay, SC (Santander Consumer Finance) or UF (Universo Flex): your system is notified of a payment or capture authorisation – regardless of the payment method (“method”) chosen by your customer.
- More details on our “Generic Notifications” are available at https://api.prod.easypay.pt/docs#tag/Notification%2Fpaths%2F~1your-generic-notification-endpoint%2Fpost .
Last updated: April 2023